
Cart abandonment rates hit 70% when shipping costs surprise customers at checkout. The fix? Accurate real-time shipping rates from trusted carriers.
Adding a shipping carrier to Shopify transforms your customer’s checkout experience. Your customers see exact delivery costs instantly. No surprises. No abandoned carts.
This blog will further walk you through how to add shipping carrier in Shopify. You’ll connect USPS, UPS, FedEx, and regional carriers. We’ll cover USA-specific setup, UK carriers, and carrier calculated shipping.
Let’s get your shipping sorted.
What Are Shipping Carriers in Shopify?
Delivery companies like USPS, UPS, FedEx, and DHL handle the physical transportation of products from your business to your customers. These companies are known as shipping carriers.
Once you add shipping carrier Shopify supports, your checkout automatically reflects real-time delivery costs. This lets shoppers select their desired delivery timeframe and pay what the carrier actually charges rather than a fixed estimate.
You can connect shipping carriers to Shopify through three different approaches:
Built-in carrier integrations: Connect directly with major shipping companies in the USA, Canada, the UK, and Australia.
Personal carrier accounts: Use your own negotiated rates, which works best for high-volume sellers.
Shipping apps: Add carriers not supported natively and unlock extra features and flexibility.
The setup process differs depending on which approach you choose. Your subscription tier affects which shipping features you can access – certain plans allow direct carrier connections, while others require you to enter rates manually.
What are the Carrier Integration Plans Available on Shopify?
Your Shopify plan determines your shipping carrier options.
Basic and Starter Plans: You can set manual shipping rates only. No real-time carrier rates.
Shopify Plan: Add carrier calculated shipping for $20/month extra. This unlocks USPS, UPS, and DHL rates.
Advanced Plan: Carrier calculated shipping included. No extra monthly fee. You also get negotiated USPS rates.
Shopify Plus: Full carrier integration. Custom carrier development available. Best negotiated rates.
Most stores on Basic plans pay flat rates or manual rates. This works for simple products with standard weights.
Carrier calculated shipping makes sense when you ship varied products. Different sizes and weights get accurate pricing.
Similar to how Shopify fulfillment services grow with your business, your shipping carrier needs grow over time.
Prerequisites Before You Connect Shipping Carrier to Shopify
Don’t skip these setup steps. Missing any causes rate calculation errors.
Shopify calculates shipping rates using product weight, so every item in your catalog should include accurate weight details.
In addition, your shipping origin address must be complete and verified, since carriers rely on this information when applying rates.
After completing the setup, create separate shipping zones for domestic and international orders and apply the appropriate carrier rates to each one. A proper Shopify shipping carrier setup ensures you can accurately calculate your Shopify shipping rates across zones and fulfillment locations.
Products without weight information can cause issues at checkout, as Shopify won’t be able to generate carrier rates and may show a ‘no shipping methods available’ message
Set product weights in grams, pounds, or kilograms. Be accurate. A 0.5 lb difference changes rates significantly.
How to Add Shipping Carrier in Shopify USA?
USA merchants get the most carrier options. This section explains how to add shipping carrier to Shopify USA stores using USPS, UPS, FedEx, and DHL.
Setting up shipping carriers isn’t as complicated as you think. Whether you handle it yourself or work with a team on your Shopify store development, proper carrier setup helps prevent checkout errors and shipping issues. But we’ve seen too many store owners overcomplicate it or miss simple steps that cost them sales.
Let me walk you through exactly how we do it for USA stores.
Step 1: Navigate to Shipping Settings
First things first – head to your Shopify admin panel. You’ll find Settings sitting in the bottom left corner.
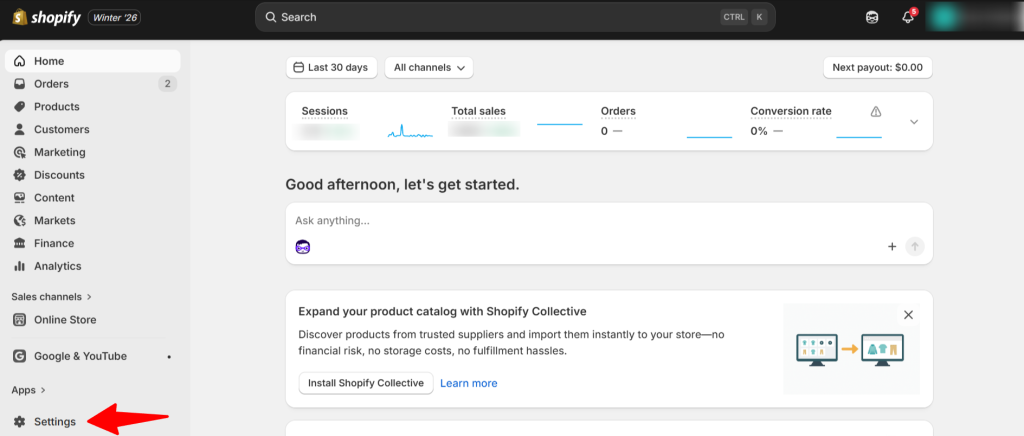
Click on ‘Settings’, then hit Shipping and delivery. What you’re looking at now are your shipping profiles.
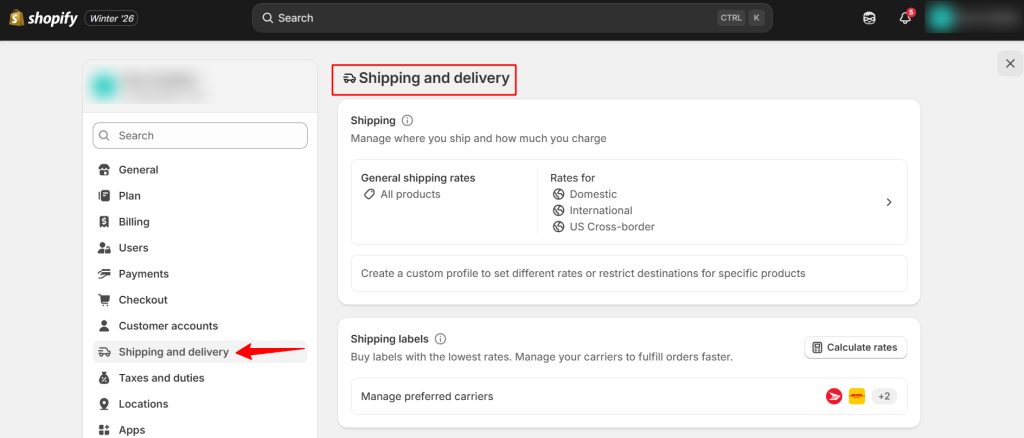
Think of these as different rule books. One profile might handle your regular products, another might manage heavy items, and so on. Each profile can show different shipping rates to your customers.
Step 2: Access Carrier Accounts Section
Scroll down until you see Carrier accounts. This is where the magic happens.
Here’s what’s cool: the carriers you see depend on where your store is located.
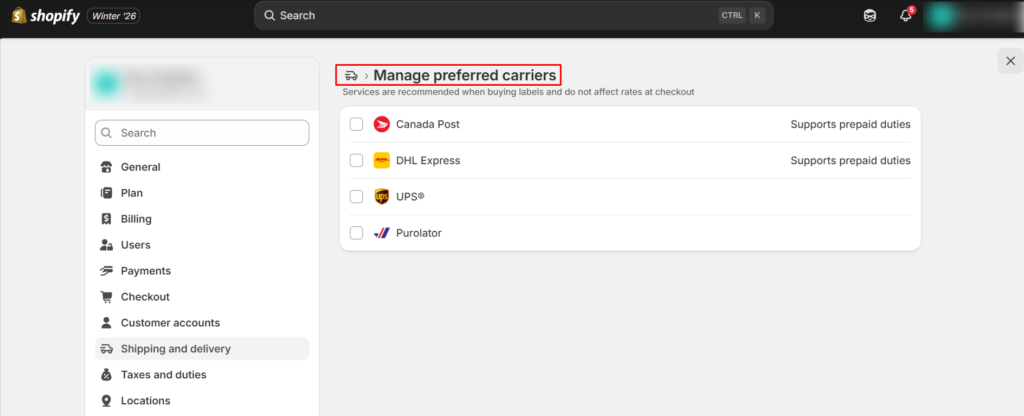
USA stores get USPS, UPS, DHL Express, and Canada Post. UK stores? Different lineup entirely (we’ll cover that in a minute).
Why does this matter? Because Shopify’s already done the heavy lifting. They’ve negotiated commercial rates with these carriers for you.
Step 3: Enable Carrier Calculated Shipping
Real talk: this feature isn’t available on every plan.
You need at least the Shopify plan (that’s the $79/month one) to show real-time carrier rates at checkout.
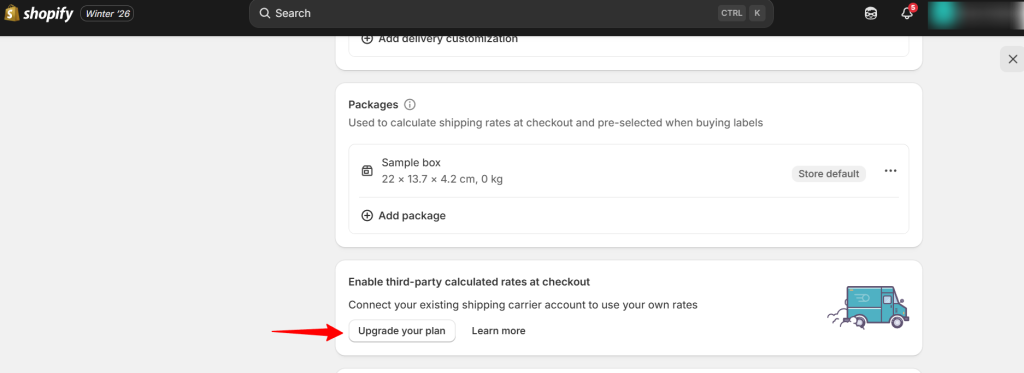
If you’re on Basic, you’ve got two choices: upgrade your plan or use a third-party shipping app.
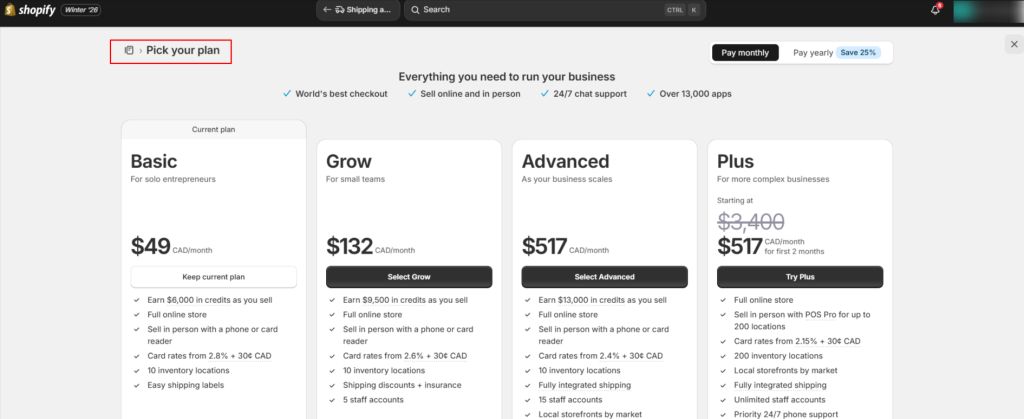
Is it worth upgrading? In our experience, yes
Step 4: Connect USPS to Shopify
USPS is going to be your workhorse for most domestic shipments. And connecting it? Literally takes two minutes.
Go to that carrier accounts section we just found. Click ‘Activate USPS account.’ That’s it.
Shopify creates your account automatically and you’ve got commercial rates that are way cheaper than what you’d pay at the post office.
USPS Services Available:
- Priority Mail (2-3 day delivery)
- Priority Mail Express (overnight)
- First Class Package Service (2-5 days)
- Media Mail (books and media)
Advanced and Plus plans get better USPS rates. Basic and Shopify plans get standard commercial pricing.
Step 5: Add UPS Integration
UPS gives you two paths. Which one you take depends on how much you’re shipping.
Path 1: Use Shopify’s UPS Rates
Just enable UPS in your carrier accounts. Done.
Shopify handles everything – rates, labels, all of it. Super simple, zero hassle.
Path 2: Connect Your Own UPS Account
Now, if you’re shipping a serious volume – like 500+ packages a month, this is where you save real money.
Go to ups.com, set up a business account, and negotiate your own rates.
Then come back to Shopify, click ‘Connect carrier account,’ pick UPS, and plug in your credentials.
Your negotiated rates now show up at checkout instead of Shopify’s standard ones. The difference can be significant.
Step 6: Set Up FedEx Connection
FedEx works almost exactly like UPS. They’re particularly good at express shipping when your customers need something fast.
Click ‘Add carrier,’ choose FedEx, then enter your FedEx account number and meter number.
(You’ll get these from your FedEx business account.)
Here’s what we always do next: test it immediately.
Add a sample package, enter a destination, see if rates pop up in a few seconds. If they don’t? Double-check those credentials.
Step 7: Enable DHL Express
DHL has one superpower: international shipping, especially for lightweight packages going overseas.
For domestic USA shipping? USPS or UPS will almost always beat them on price.
But for internationals? DHL often wins.
Add your DHL credentials in the carrier section (your account manager will give you these).
Once connected, DHL rates automatically show for international orders while domestic ones stick with USPS or UPS.
How to Add Shipping Carrier to Shopify UK
To add shipping carrier to Shopify UK stores, you’ll need shipping apps that support Royal Mail and DPD.
Connect Royal Mail to Shopify
Royal Mail doesn’t have a direct integration with Shopify, so you’ll need to use a third-party app or shipping platform.
Option 1: Go with Shiptheory
Grab the Shiptheory app from the Shopify App Store and connect it to your Royal Mail OBA account.
Shiptheory sits in the middle, pulling your orders from Shopify and pushing them to Royal Mail.
Option 2: Try Shipstation
Shipstation does the same thing but also lets you manage multiple carriers from one place, though some growing brands also compare Shipstation alternatives based on pricing and automation features.
Super handy as you grow.
Royal Mail services you can offer:
- 1st Class – next day delivery
- 2nd Class – 2-3 days, cheaper option
- Special Delivery Guaranteed – when timing is critical
- International options for EU and worldwide
Add DPD UK Integration
First, you need a DPD business account.
Head to dpd.co.uk/business and apply. Usually takes 2-3 business days to get approved.
Once you’re in, connect DPD using apps like Shipstation or Veeqo.
Most UK sellers I work with run a multi-carrier setup: Royal Mail for small items, DPD for premium service, Evri for budget-friendly options. Gives customers choices while keeping your costs down.
Just like choosing the right 3PL provider, selecting carriers depends on your products and customer expectations.
How to Enable Carrier Calculated Shipping Shopify
Here’s exactly how to enable carrier calculated shipping Shopify stores rely on for real-time rates.
Verify Whether Your Plan Supports It
Check your Shopify plan. You will need a Shopify Plan ($79/month) or higher. Basic plan users must upgrade or use flat rates. No way around this requirement.
Configure Shipping Zones
Go to Settings and click on ‘Shipping and delivery.’ Click on your default shipping profile.
Create or edit shipping zones:
- Domestic (your country)
- International (rest of world)
- Regional zones (neighboring countries)
Each zone needs carrier rates added separately.
Add Carrier Rates to Zones
Click on a shipping zone. Click the ‘Add rate’ button.
Select ‘Use carrier or app to calculate rates.’ Choose your carrier from the dropdown.
Pick which services to offer:
- USPS: Priority Mail, Priority Express
- UPS: Ground, 2nd Day Air, Next Day
- FedEx: Ground, Express Saver, Standard Overnight
You can enable all services or select specific ones. More options give customers flexibility.
Set Handling Fees (Optional)
Add handling fees to cover packaging costs. This adds a flat amount or percentage to carrier rates.
Click ‘Add handling fee’ when setting up rates. Enter an amount like $2.00 or 10%.
Handling fees appear as part of the total shipping cost. Customers see one combined rate.
Test Your Carrier Rates
Add products to a test order. Enter different shipping addresses. Check if rates display correctly.
Test both domestic and international addresses. Verify rates match carrier websites. If rates don’t show, check product weights. Missing weights break rate calculations.
Can You Use Third-Party Apps for Shopify Carrier Integration
Shopify’s built-in carriers don’t handle every scenario. That’s where apps come in handy. Third-party apps make it easier to connect shipping carrier to Shopify when native integrations aren’t available.
When to Use Shipping Apps
Apps become necessary when:
- Your carrier isn’t available natively on Shopify
- You need more advanced shipping rules
- You’re managing shipments from multiple warehouses
- You want to print labels in batches
- You prefer branded tracking pages for customers
The right apps can really expand what Shopify’s shipping can do.
Best Shipping Apps for Shopify
Shipstation: A multi-carrier platform connecting 40+ carriers. It’s ideal for stores with high order volumes.
Plans start at $9.99/month and include batch printing plus automation rules.
Shippo: A more affordable choice with access to USPS, UPS, FedEx, and DHL.
There’s a free plan to start with, then you pay per label. Works well for newer stores.
Easyship: Focuses on international shipping with pre-negotiated rates from 250+ carriers globally. Perfect for stores selling worldwide since it automatically handles customs paperwork.
Advanced Shipping Manager: Lets you build complex shipping rules and charge based on things like product type, weight, or where it’s going. It doesn’t print labels, it also calculates rates. You can use it together with other apps.
Third-party logistics providers like AMZ Prep can handle both shipping and fulfillment, simplifying your entire operation including complex Shopify split shipping configurations for multi-warehouse businesses.
How to Install Third-Party Shipping Apps for Carrier Integration on Shopify
- Visit Shopify App Store. Search for your chosen shipping app. Click ‘Add app.’
- Grant the required permissions. Apps need access to orders, products, and shipping settings.
- Follow the app’s setup wizard. Connect your carrier accounts within the app.
- Enable the app in your shipping zones. Go to Settings and click on ‘Shipping’ and then click on the ‘Add rate’ and select your app.
How to Set Up Shipping Profiles for Different Products on Shopify
Shipping profiles let you apply different rates to different products. Super useful for varied catalogs.
Create Custom Shipping Profiles
- Go to Settings and select ‘Shipping and delivery.’ Click ‘Create shipping profile.’
- Name it descriptively. Examples: Heavy Items, Fragile Products, International Only.
- Add products to the profile. Select by collection, product type, or vendor.
Assign Carrier Rates to Profiles
Each profile gets its own carrier settings. Heavy items might only offer Ground shipping. Fragile items might exclude economy carriers.
Configure zones and rates separately for each profile.
Common Shipping Profile Strategies
By Weight: Separate profiles for under 1 lb, 1-5 lbs, and over 5 lbs products.
By Fragility: Glass and ceramics get special handling. Charge higher rates or restrict carriers.
By Destination: Some products ship internationally. Others stay domestic only.
By Fulfillment Location: If you use multiple warehouses, create profiles per location.
Profiles prevent showing impossible shipping options. A 50 lb item shouldn’t offer Priority Mail envelope rates.
How to Troubleshoot Common Carrier Integration Issues on Shopify
Even perfect setups hit problems. Here’s how to fix the most common ones.
‘No Shipping Methods Available’ Error
This checkout blocker has five main causes.
Missing Product Weights: Check every product. Add weights in product details.
Incorrect Shipping Zones: Verify customer’s country is in a zone. Add missing regions.
Carrier Service Issues: Check carrier status pages. API outages happen occasionally.
Conflicting Apps: Disable shipping apps one by one. Find which causes conflicts.
Address Format Problems: Customer entered invalid zip code or city. Carriers can’t calculate rates.
Fix product weights first. This solves 80% of cases.
Carrier Rates Not Displaying
Rates calculated but don’t show at checkout. Check these settings.
Plan Limitations: Confirm your plan includes carrier calculated shipping.
Zone Configuration: Rates must be added to the specific zone the customer is in.
Service Restrictions: Some carrier services have weight or destination limits.
API Connection: Re-connect your carrier account. Credentials might have expired.
Test with a manual order. Use your own address. See if rates appear.
Incorrect Shipping Calculations
Rates show but seem wrong. Too high or too low.
Packaging Dimensions: Carriers use dimensional weight. Update package sizes in settings.
Handling Fees: Check if handling fees are applied correctly. 10% on $100 shipping is $10 extra.
Product Weights Wrong: Verify weights match your actual products. A typo here multiplies costs.
Multiple Locations: Orders splitting between warehouses calculate multiple shipping costs.
Compare Shopify’s rate to the carrier’s website calculator. Find where numbers diverge.
Label Printing Failures
Connected carriers but can’t print labels.
Address Validation: Carrier rejected the shipping address. Common with apartment numbers.
Account Issues: Check carrier account status. Suspended accounts can’t create labels.
App Permissions: Shipping apps need full access. Revoke and re-grant permissions.
Special Characters: Remove emojis and special symbols from customer names.
Test with a simple domestic address first. Then try going international.
Advanced Carrier Configuration Tips
If rates seem incorrect or performance drops, knowing how to change shipping carrier on Shopify can help prevent delivery issues.
Offer Multiple Speed Options
Don’t just enable one service. Give your customers choices. Include economy, standard, and express options. Different customers have different needs.
Some pay extra for speed. Others wait longer for savings.
Set Smart Handling Fees
Handling fees offset packaging costs. But high fees increase cart abandonment. Smart pricing strategies can help reduce Shopify shipping costs while keeping checkout conversion rates healthy.
Test different amounts. Start with a $1-2 flat fee. Or 5-8% percentage. Don’t apply handling fees to free shipping orders as customers notice and complain.
Configure Delivery Date Estimates
Show estimated delivery dates at checkout as it will increase your conversion rates.
Go to Settings, and click on ‘Shipping’ and click on ‘General.’ Enable ‘Show estimated delivery dates.’
Set your processing time. Add this to carrier transit times for accurate estimates.
Use Rate Shopping Apps
Rate shopping shows the cheapest option first. Customers save money automatically.
Apps compare all enabled carriers. Display lowest rate prominently. You can still offer premium faster options. But highlight the value choice.
Exclude Carriers for Specific Products
Some products shouldn’t ship certain ways. Hazmat can’t fly. Perishables need fast delivery. Use shipping apps to create rules. Block air shipping for batteries. Require express for food.
Create Free Shipping Thresholds
Offer free shipping above order values. Use carrier calculated rates below threshold.
Set a threshold at 2-3x your average order value. This will encourage larger purchases. Shopify’s built-in free shipping works with carrier rates. You can enable this in the shipping zones.
International Shipping Carrier Setup
Selling globally needs different carrier configurations.
Enable International Zones
Create zones for major markets. USA, Canada, UK, EU, Australia.
Group smaller countries into the ‘Rest of World’ zone. Each zone gets appropriate carriers. DHL Express for Europe. Canada Post for Canada.
Handle Customs Documentation
International shipments need customs forms. Carriers require accurate product descriptions.
Add HS codes to products. These classify items for customs. Wrong codes cause delays. Set product country of origin. Customs needs this for duty calculations.
Choose DDP vs DDU Shipping
DDP (Delivered Duty Paid): You pay all customs fees. The customer pays nothing on delivery.
DDU (Delivered Duty Unpaid): Customer pays customs fees. Lower upfront shipping cost.
DDP provides better customer experience. No surprise charges. But you need to calculate duties accurately. Most Shopify apps support DDP calculation. You can enable this in app settings.
Optimize Regional Carriers
Global carriers cost more. Regional carriers often ship cheaper domestically. For UK customers, use Royal Mail instead of DHL. For Australia, use Australia Post.
Configure zones to prefer regional carriers. Fall back to global carriers only when necessary.
Managing international shipping complexity is where professional fulfillment services add real value.
Is Shopify Shipping or Your Own Carrier Account More Cost-Effective?
Should you use Shopify’s carrier rates or your own negotiated accounts?
Shopify’s Carrier Discounts
Shopify negotiates bulk rates with carriers. You access these without minimum volume.
USPS Commercial Rates: 15-30% off retail prices. Available on all plans with carrier calculated shipping.
USPS Commercial Plus: Extra 5-10% discount. Only on Advanced and Plus plans.
UPS Rates: 10-20% off retail. Available when using Shopify’s UPS integration.
These discounts apply automatically. No negotiation needed.
When Your Own Account Saves Money
High-volume stores get better rates directly from carriers.
Shipping 500+ packages monthly? Contact carriers for custom quotes. You’ll beat Shopify’s rates.
Your own account also gives:
- Better customer service
- Pickup scheduling flexibility
- Access to specialized services
- Insurance options
Total Cost Calculation
Compare total costs, not just per-package rates.
Shopify Shipping Costs:
- Monthly plan fee ($79+ for carrier calculated)
- Per-label costs
- No account minimums
Own Account Costs:
- Carrier account monthly fees (UPS charges $15-25/month)
- Per-package rates
- Possible volume minimums
Calculate your monthly shipping volume. Multiply by rate differences. Factor in monthly fees.
Hybrid Approach
Use both. Shopify shipping for USPS. Your own account for UPS or FedEx.
This gives flexibility. Customers see USPS rates automatically. You print UPS labels from your account separately.
What are the Best Practices to add Shipping Carrier on Shopify
Below are some of the proven strategies for smooth shipping operations.
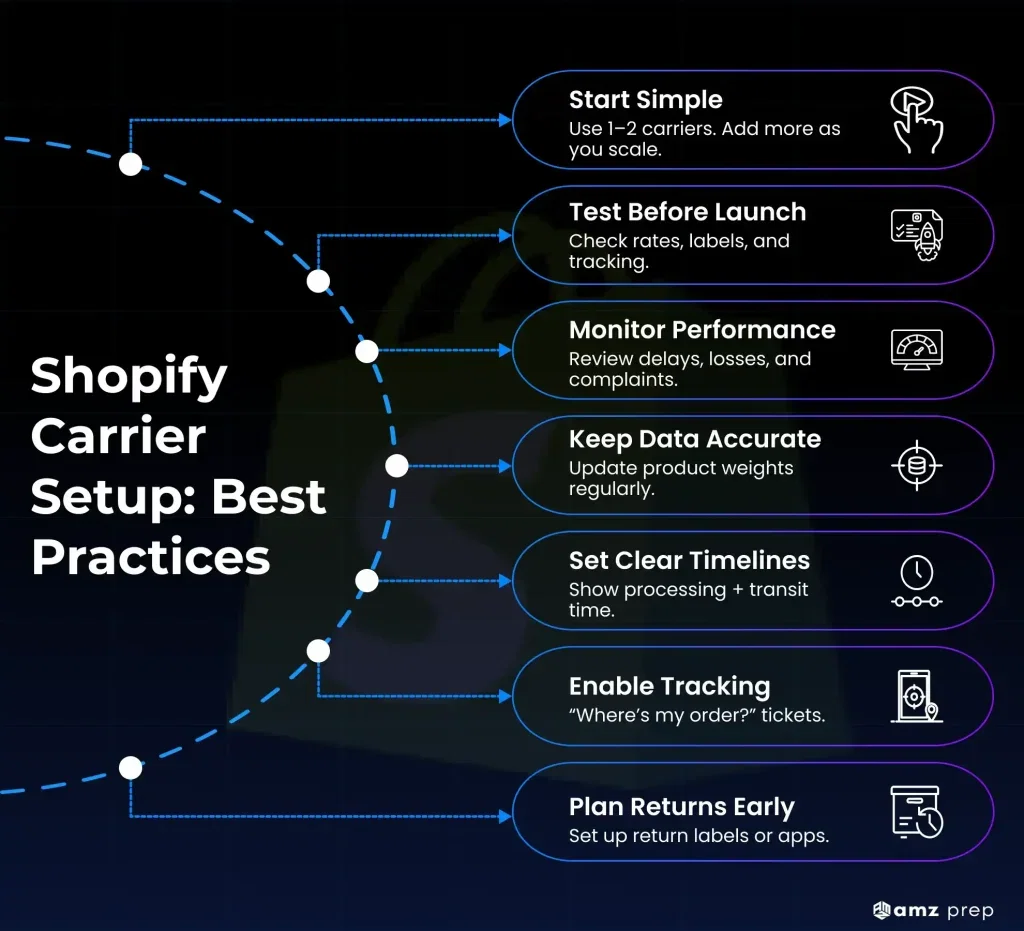
Start Simple and Add Complexity Later
If you’re new to Shopify, it’s best to enable one or two carriers. Don’t overwhelm customers with options. You can use USPS Priority Mail to cover most domestic needs. Add international carriers later.
As volume grows, add carriers and services. Test each before enabling.
Test Everything Before Launch
Create test orders. Ship to yourself. Verify rates, labels, and tracking work.
Test edge cases:
- Maximum weight products
- International destinations
- Multi-item carts
- Different shipping zones
Fix problems before real customers encounter them.
Monitor Carrier Performance
Track delivery times and success rates. Some carriers perform better in certain regions.
Check reports monthly. Look for:
- Late deliveries
- Damaged packages
- Lost shipments
- Customer complaints
Switch carriers if performance drops. Your reputation depends on reliable delivery.
Keep Product Data Accurate
Review product weights quarterly. Products change. Weights need updates.
Incorrect weights cause rate calculation errors. They also create billing discrepancies when carriers reweigh packages.
Set up a spreadsheet. Track actual package weights after fulfillment. Compare the product weights in Shopify.
Communicate Delivery Times Clearly
Show processing time plus transit time. Don’t promise what carriers can’t deliver.
Be conservative with estimates. Under-promise and over-deliver. Add processing time buffer during peak seasons. Holiday orders take longer to pack.
Offer Tracking Automatically
Enable automatic tracking emails in Shopify settings. Customers want visibility. Tracking reduces ‘where’s my order’ support tickets by 40%. It’s worth the few seconds setup.
Plan for Returns
Returns need shipping too. Configure return label processes early. Some carriers offer prepaid return labels. Others need labels created per return.
Apps like Return Magic automate return shipping. They generate labels when customers request returns.
Seasonal Shipping Considerations
Peak seasons need different carrier strategies.
Prepare for Holiday Rush
Black Friday through Christmas strains all carriers. Plan accordingly.
Weeks Before Peak:
- Enable additional carriers for redundancy
- Set realistic delivery estimates
- Stock extra packaging supplies
- Test label printing at scale
During Peak Season:
- Monitor carrier cutoff times daily (they change)
- Communicate delays proactively
- Offer local pickup options
- Consider expedited shipping only
Adjust Rates for Demand
Some stores increase handling fees during peak season. This covers extra labor and materials. Be transparent. Notify customers of seasonal adjustments.
Others absorb costs to maintain goodwill. Your choice depends on margins.
Backup Carrier Strategy
Primary carrier overwhelmed? Have backup options ready. If USPS delays hit 5+ days, switch to UPS Ground. Cost more but delivers reliably.
Keep backup carriers configured but hidden. Enable them when needed.
Future of Shopify Carrier Integration
Shipping technology keeps improving. Here’s what’s coming.
AI-Powered Rate Optimization
New apps use AI to predict the best carrier per package. They consider cost, speed, and reliability.
These apps learn from your shipping history. Accuracy improves over time.
Carbon-Neutral Shipping Options
Carriers offer carbon offset programs. Customers increasingly care about environmental impact.
Shopify added carbon offset features. Enable it in the shipping settings.
Customers can pay small fees to offset delivery emissions which is good for brand reputation.
Same-Day Delivery Integration
Local courier integration grows. Apps connect Shopify to Uber Direct, DoorDash Drive, and Postmates.
Same-day delivery works for local customers. Premium service commands higher prices.
Blockchain Tracking
Some carriers test blockchain for package tracking. Provides tamper-proof delivery records. This is still experimental. But expect wider adoption in 2-3 years.
Conclusion
Adding a shipping carrier to Shopify takes 15 minutes. The impact lasts forever. Real-time carrier rates reduce cart abandonment. Customers trust actual carrier pricing. They complete purchases confidently.
Start with one carrier. USPS works for most USA stores. Royal Mail apps serve UK merchants well. Test thoroughly before launching. Ship to yourself. Verify rates which will match expectations.
Add carriers as you grow. More options give customers flexibility. But don’t be overwhelmed with choices. Monitor performance monthly. Switch carriers if delivery times slip. Your reputation depends on reliable shipping.
Accurate shipping rates are fundamental to ecommerce success. Get this right and watch conversion rates improve.
Need help managing Shopify fulfillment? Explore AMZ Prep’s Shopify fulfillment services for end-to-end order management across USA, Canada, and Europe.
Frequently Asked Questions
How to add shipping carrier to Shopify?
To add shipping carrier to Shopify, go to ‘Settings’ in your Shopify dashboard. Click on ‘Shipping and delivery’ and select ‘Carrier accounts.’ Enable your preferred carrier. For native carriers like USPS, click activate. For others, connect your account credentials.
What Shopify plan do I need for carrier calculated shipping?
You will need a Shopify Plan ($79/month) or higher. Basic and Starter plans don’t support carrier calculated shipping. Upgrade or use shipping apps instead.
Can I use my own carrier account with Shopify?
Yes. Connect your UPS, FedEx, or DHL account in the carrier section. Enter your account credentials. Your negotiated rates display at checkout.
How much does the carrier calculate shipping cost?
On Shopify Plan, it’s $20/month extra. On Advanced and Plus plans, it’s included. No per-transaction fees from Shopify. You pay actual carrier rates to carriers.
What carriers work with Shopify in the UK?
UK stores can’t use native carrier integration. Install apps like Shipstation or Shiptheory to connect Royal Mail, DPD, Yodel, and Evri.
How do I enable USPS on Shopify?
Navigate to Settings and click on ‘Shipping’ and select ‘Carrier accounts.’ Click ‘Activate USPS account.’ Shopify creates your account automatically. Commercial rates activate immediately.
Can I offer different carriers for different products?
Yes. Create shipping profiles for product groups. Assign different carriers to each profile. Heavy items get Ground only. Light items get all options.
Why aren’t shipping rates showing at checkout?
Check product weights are set. Verify shipping zones include customer location. Confirm your plan supports carrier calculated shipping. Test carrier API connections.
How do I set up international shipping carriers?
Create international shipping zones. Add carriers that serve those regions. Configure customs settings. Enable DHL Express or UPS Worldwide for global shipping.
Should You Use Shopify Shipping or a Third-Party App?
Shopify Shipping is simpler for basic needs. Apps provide more carriers, features, and flexibility. High-volume stores benefit from apps. Small stores work fine with Shopify Shipping.

Arishekar N is a Vice President (VP) of Marketing at AMZ Prep, specializing in ecommerce fulfillment and Amazon logistics strategies with a proven track record of driving growth for e-commerce businesses. He is a strategic leader with extensive expertise in marketing, e-commerce operations, SEO & advertising, and branding.
Stay updated on his latest insights by following him

















Comments